Easy way to do Share Extension in iOS
Implementing Share Extension in Swift
Wonder how to make your application can share any picture or file or text even URL into our own application? Well everyone knows we can use App Extension and create our extension for doing it. But imagine if we have multiple clients and need to use a specific token for each client, or we do have many configurations for the UI that can be displayed differently according to the clients, how we can achieve that? This tutorial will try to help you and make life easier!
First of all, there are 2 big pictures that we will do :
- Configure our app into 3 different dynamic frameworks with one main application, one framework for selector UI, one for Sharing Storage, one for NetworkRequest and the main app is our own Share Extension UI.
- Create an App Extension for the sharing methods.
Let start with the big picture from the picture above about what’s going on next. The share view controller will call out the CustomUIKit frameworks for showing the UI of the user (all of the Business logic of it will be covered inside that UI). Second, during that process in the setup logic, we are going to call and set the sharing access token that coming from the main application and use it into the Custom UI Kit for displaying the data. We also can use the token for requesting a network request into the NetworkFramework. This way we are trying to implement SOLID principle into our Sharing Extension !. Sharing View Extension will only have one small amount of logic only for routing what it is going to do with the object.
Let begin with put new target into an existing of any project that you have. Choose File -> New Target -> Share Extension
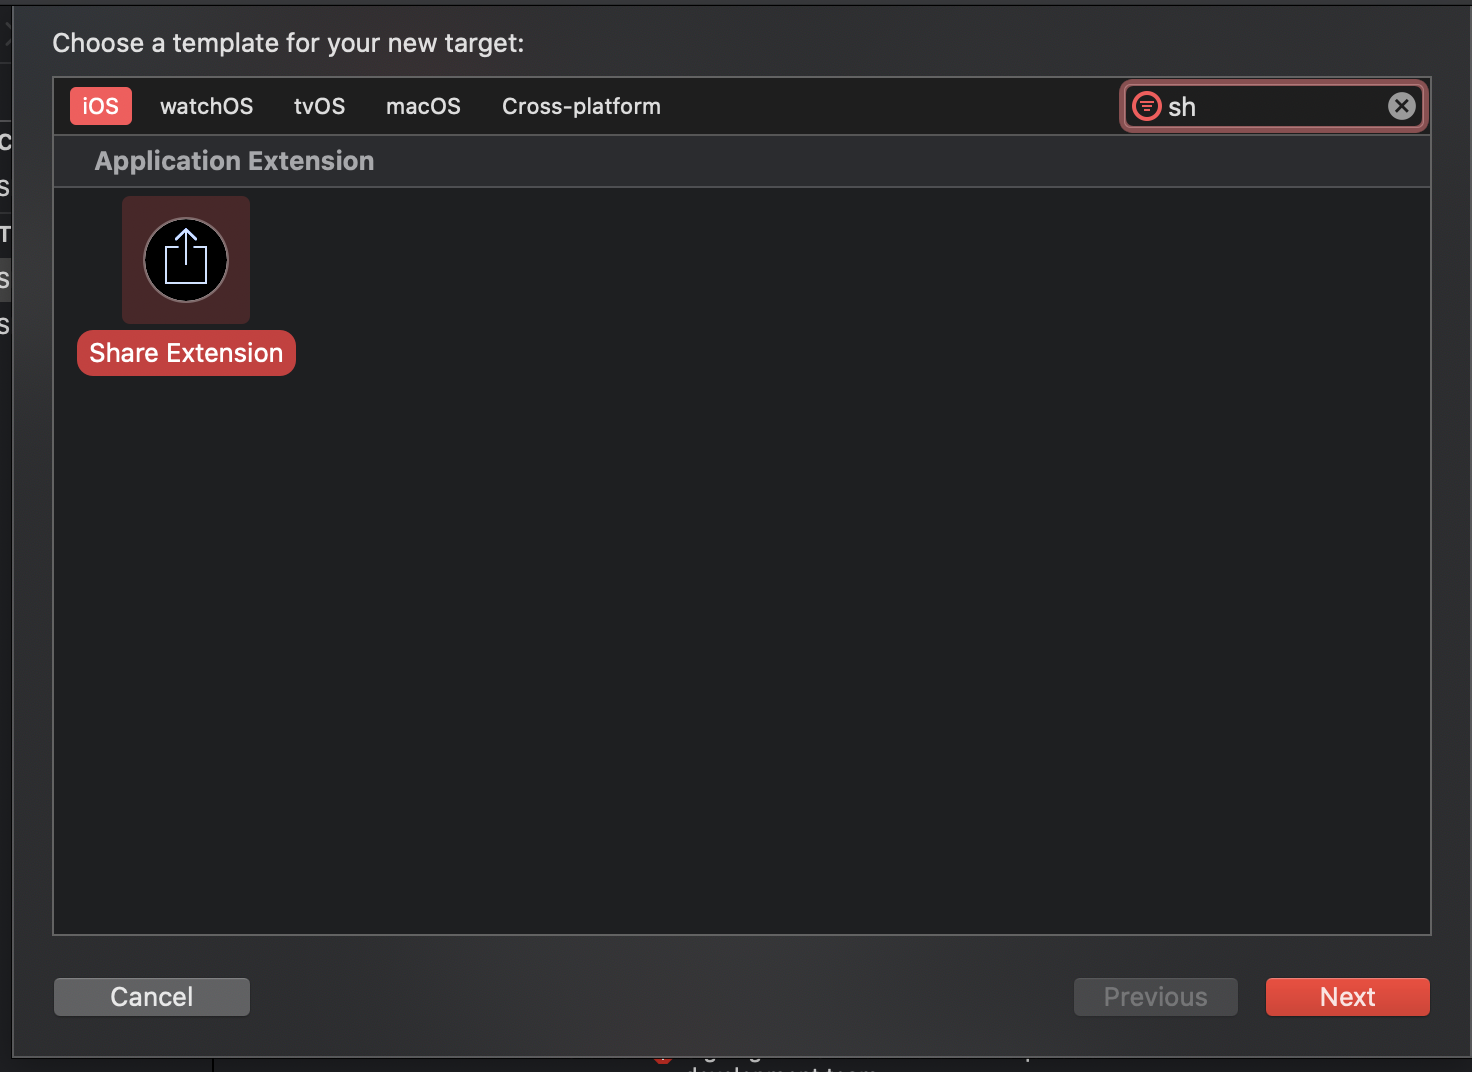
After we put a Share Extension, we must check whether the App Group identifier is matching with each other or not. App Group Identifier is the key to hold the connection between the container and the Extension to communicate with each other. Both of the Parent App and the Extension is having their own lifecycle, hence they can not easily send the data or communicate. Apple provides an App Group identifier to easily detect which Parent app that having matching extension through the apple container (Photos, Browser, Video, etc).
In the main project, see the Signing & Capabilities section, make an App Identifier (prefix with group and suffix is container by default)

In the share.entitlements also check whether the App Groups object has one of the same identifier of the targeted application

The next steps are we are going to make 3 different dynamic frameworks to encapsulate each project into different microservices.
- SelectorUIViewKit : This framework holds the responsibility to display SelectionView that might be reusable on another project (Pure View). I will use SwiftUI.
- StorageKit : This framework holds the responsibility for sharing a storage system that useful for doing any CRUD process in our database. It can be generic storage that can use any kind of database that we want to implement. For this tutorial, I will use Apple Native UserDefaults.
- NetworkKit : This framework holds the responsibility to network processes throughout our projects. For this tutorial, I will use the default URLSession.
Start with the SelectorUIViewKit, create a new project, and let start with a new view, we can call it as SelectorView.
 1//
 2//  SelectorView.swift
 3//  SelectorUIViewKitTutorial
 4//
 5//  Created by Michael Abadi Santoso on 1/27/20.
 6//  Copyright © 2020 Michael Abadi Santoso. All rights reserved.
 7//
 8import SwiftUI
 9
10public struct BaseView: View {
11    let user: [User]
12
13    public var body: some View {
14        SelectorView(user: user)
15    }
16}
17
18private struct SelectorView: View {
19    let user: [User]
20
21    var body: some View {
22        NavigationView {
23            List {
24                ForEach(user, id: \.id) { user in
25                    VStack(alignment: .leading) {
26                        Text("NAME: \(user.name)")
27                        Text("JOB: \(user.job)").padding(.top, 10)
28                    }
29                }
30            }.navigationBarTitle("User")
31        }
32    }
33}
34
35struct SelectorView_Previews: PreviewProvider {
36    static var previews: some View {
37        SelectorView(user: [User(id: "test", name: "Michael", job: "Programmer")])
38    }
39}
This SelectorView is pretty straightforward, it contains ListView displaying a name and the job description. After that, we need to create a SelectorEngine. This class will provide the public capability for any project that wants to import the framework. Some of the capabilities I will expose to the public are presentSelectorView and getSelectorView.
 1//
 2//  SelectorEngine.swift
 3//  SelectorUIViewKitTutorial
 4//
 5//  Created by Michael Abadi Santoso on 1/27/20.
 6//  Copyright © 2020 Michael Abadi Santoso. All rights reserved.
 7//
 8import Foundation
 9import SwiftUI
10
11/// User model
12public struct User: Identifiable, Codable {
13    public let id: String
14    public let name: String
15    public let job: String
16
17    public init(id: String, name: String, job: String) {
18        self.id = id
19        self.name = name
20        self.job = job
21    }
22}
23
24/// Class to represent the engine of this framework.
25public class SelectorEngine {
26
27    public init() {}
28
29    /// Presenting a selector view method.
30    /// - Parameters:
31    ///   - user: the user model.
32    ///   - viewController: the source view controller to present the selector view.
33    public func presentSelectorView(withUsers user: [User], from viewController: UIViewController) {
34        let contentView = BaseView(user: user)
35        let contentViewController = UIHostingController(rootView: contentView)
36        let contentNavigationController = UINavigationController(rootViewController: contentViewController)
37        viewController.present(contentNavigationController, animated: true, completion: nil)
38    }
39
40    /// Retrieving the base view of the selector view.
41    /// - Parameter user: the user model.
42    public func getSelectorView(withUsers user: [User]) -> BaseView {
43        return BaseView(user: user)
44    }
45}-
presentSelectorView(withUsers user: [User], from viewController: UIViewController) : The engine will ask the project to just give a datasource of User model that defined by the framework and the source view controller. This way this framework purely loose coupled with the datasource and the view.
-
getSelectorView(withUsers user: [User])->BaseView : This function will return the base view as a SwiftUI View. I hide the specific SelectorView on this framework by the BaseView instead. This way, the framework won’t know anything about SelectorView.
Now let’s move to the interesting part which is StorageKit. This framework solely will focus on storing and sharing the data between each other. For your information, the concept of Share Extension is, it separately has its own lifecycle with the parent application. That way we can not store the data into the same database engine that just lives on one of the lifecycles. However, Apple has the bridging database that can be useful for sharing the data between Extension and parent application which is through UserDefaults with a suiteName. Suite name here is the app group identifier that identifies one extension is belong to the correct parent application.
 1//
 2//  StorageKit.swift
 3//  StorageKitTutorial
 4//
 5//  Created by Michael Abadi Santoso on 1/27/20.
 6//  Copyright © 2020 Michael Abadi Santoso. All rights reserved.
 7//
 8import Foundation
 9
10public let appGroupIdentifier = "group.com.michaelabadi.ShareKitTutorial.container"
11
12/// StorageKit task is loading and saving any kind of token authentification
13public class StorageKit {
14
15    public enum StorageType {
16        case `default`
17        case sharing
18    }
19
20    private let type: StorageType
21
22    public init(type: StorageType) {
23        self.type = type
24    }
25
26    /// Function for saving the token.
27    /// - Parameter token: the existing token.
28    public func saveToken(_ token: String) {
29        getUserDefault()?.set(token, forKey: "token")
30    }
31
32    /// Function for loading the token.
33    public func loadToken() -> Any? {
34        return getUserDefault()?.value(forKey: "token")
35    }
36
37    /// Function for delete the existing token.
38    public func deleteToken() {
39        getUserDefault()?.removeObject(forKey: "token")
40    }
41
42    private func getUserDefault() -> UserDefaults? {
43        switch type {
44        case .default:
45            return UserDefaults.standard
46        case .sharing:
47            return UserDefaults(suiteName: appGroupIdentifier)
48        }
49    }
50
51}
The Storage Kit is easy enough to understand. There are basic concepts of database operation which is Create (Save), Read (Load), Update (Save) and Delete operation. UserDefaults(suiteName:) is the most important one for the Extension operation. However, you can expand this StorageKit to be able to use another kind of database system as you wish.
Next is NetworkKit. This is an extra Framework that I want to make not only for ShareExtension but for the parent application. You can reuse this for other purposes as well. However, you can have simple URLSession implementation inside the ShareKit instead. (This step is optional).
 1//
 2//  NetworkKit.swift
 3//  NetworkKitTutorial
 4//
 5//  Created by Michael Abadi Santoso on 1/27/20.
 6//  Copyright © 2020 Michael Abadi Santoso. All rights reserved.
 7//
 8import Foundation
 9
10public protocol NetworkBaseRequest {
11    var endpoint: String { get }
12    var params: [String: Any]? { get }
13}
14
15public typealias HttpCompletion = (_ result: Any?,_ error: Error?) -> Void
16
17public enum HttpMethod {
18    case get
19    case post
20}
21
22public let mockResult = [
23    ["id":"0", "name": "Michael", "job": "Programmer"],
24    ["id":"1", "name": "Niramon", "job": "QA"]
25]
26
27/// Network class for sending any HTTP Request
28public class NetworkKit {
29
30    public init() {}
31
32    /// Send an HTTP Request.
33    /// - Parameters:
34    ///   - request: The request object of detailed destination.
35    ///   - type: type of the http request.
36    ///   - completion: the result or error.
37    public func sendRequest(_ request: NetworkBaseRequest, type: HttpMethod, completion: HttpCompletion) {
38        completion(mockResult, nil)
39    }
40
41    /// Setup the network with proper token.
42    /// - Parameter token: The token needed for authentification of the networking.
43    public func setupAuthentification(withToken token: String) {
44        // You can setup your token as header or whatever it is in here as well
45    }
46}-
sendRequest() : This function is for getting the result that we are going to use for mapping the data into the model before displaying it into the View.
-
setupAuthentification(withToken) : This function is for setting your own token as a request header or anything you want to do with the token on the Network setting.
Finally let see on our ShareKit Extension file which is ShareViewController.
 1//
 2//  ShareViewController.swift
 3//  SharingExtension
 4//
 5//  Created by Michael Abadi Santoso on 1/28/20.
 6//  Copyright © 2020 Michael Abadi Santoso. All rights reserved.
 7//
 8import UIKit
 9import StorageKitTutorial
10import NetworkKitTutorial
11import SwiftUI
12
13/// Mocking Request class for the networking call
14final class Request: NetworkBaseRequest {
15    var params: [String : Any]? = nil
16
17    var endpoint: String {
18        return "v1/api/request"
19    }
20}
21
22/// Share Extention main view
23final class ShareViewController: UIViewController {
24
25    private let storage = StorageKit(type: .sharing)
26    private let network = NetworkKit()
27
28    override func viewWillAppear(_ animated: Bool) {
29        super.viewWillAppear(animated)
30        setupToken()
31    }
32
33    /// Initialize the token from the main app and the extention take the token from main app
34    private func setupToken() {
35        if let token = storage.loadToken() as? String {
36            network.setupAuthentification(withToken: token)
37            print("TOKEN : \(token)")
38        }
39    }
40
41    @IBSegueAction func addView(_ coder: NSCoder) -> UIViewController? {
42        return UIHostingController(coder: coder, rootView: ShareContentView())
43    }
44
45}
As you can see in the class interface above, the system will call setupToken() whenever the view interface appears to set up the shared token for reusing it. However, you must open the parent app at least once for saving the initial token before loading it in here. Also, notice on the top, we import all the necessary framework for doing all the operation we need. Don’t forget also to embed those frameworks beforehand on the main project. Now let run the application and see how it runs. (Don’t forget to set up the main project view and save the initial token on the main project as well (i.e. in the AppDelegate).
Okay, that’s all the easy way to develop a Share Extension as well the knowledge of how to utilize the dynamic frameworks into our application !. There is a lot of other x-factors that we need to understand more which is how to configure the subquery or activation rules for the Extension with their Info.plist, so we able to limit what kind of stuff we can share into our parent application, and also how do we take and process the item through NSExtensionItem. For instance, if you would like to put more restrictions on how many photos we can share, we must put the new rule on Extensions Info.plist file

Above Info.plist I put a limitation on the Maximum number of Photos I can share (20). Full list of rules can be shown in here: Rules
So far, we have learned about Extensions and Dynamic framework’s role in our application. Let me know if you have another question! Full source code: Project