Understanding WidgetKit in 5 minutes
Learn how to use widget kit in iOS
One of the most interesting topics in WWDC 2020 was about WidgetKit. Yeah, this small icon on the home screen of our phone will represent some of the contents within the app itself!. Recently, I try to implement WidgetKit into my own project. Let’s talk about some key points of WidgetKit itself before we go ahead. There are 4 key points what makes your WidgetKit great :
-
Glanceable: a great widget displays the right amount of content
-
Relevant: a great widget displays relevant content to the user, based on time and importance, this is very important for Smart Stack, too
-
Personalized: a great widget supports as many sizes as possible, and let the user choose the widget intents via the widget configuration
-
Widget is not mini apps
Once we make a Widget we can combine those widgets into a SmartStack as well with the Relevancy of each Widget. Now how does Widget actually works behind the scene?
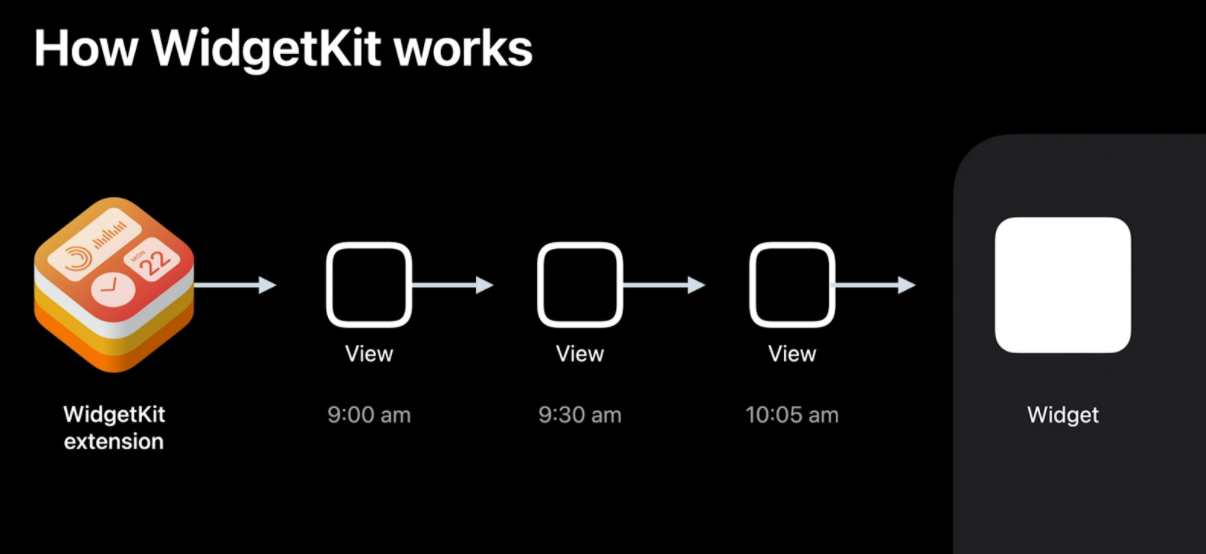
WidgetKit works through a Timeline system. WidgetKit extensions are basically background extensions that draw a view hierarchy over time. The data can be either refreshed from the app or through the scheduler within the extension.
Defining a Widget
To define a widget there are 4 key points :
-
Kind: Each widget can support multiple kinds of widgets, for example single stock widget, list stock widget, and detail stock widget
-
Configuration: Either StaticConfiguration or IntentConfiguration . Static configuration is when the widget only need to show specific data upfront, but Intent configuration extends the capabilities to use dynamic options through Intent frameworks
-
Widget Family: The template a widget uses, can be any combination of small, medium, or large
-
Placeholder: A temporary view WidgetKit uses to render the widget for the first time, generic representation of the widget
To create a glanceable experience, Widget needs to avoid stateless UI, no scrolling, no video, or heavy animations as well as providing easy tap interactions with deeplink into our app.
Views, Timelines, and Reloads
When creating a Widget, there will be 2 concepts :
-
Snapshot: When the system requests one, our widget should provide its current representation. This can be a sample data that can be used for short-lived display such as showing the Widget in the Edit Widget options
-
Timelines are combinations of a view and a date, that tells the system at what time that view should be shown. In here we can schedule when the Widget need to refresh the data
 1public protocol TimelineProvider {
 2    associatedType Entry: TimelineEntry
 3    typealias Context = TimelineProviderContext
 4
 5    func snapshot(with context: Self.Context,
 6                    completion: @escaping (Self.Entry) -> ())
 7
 8    func timeline(with context: Self.Context,
 9                    completion: @escaping (Timeline<Self.Entry>) -> ())
10
11}
Timeline Provider is the datasource that we need to provide to the Widget configuration. We can also inject a timeline reload policy to schedule an update. 3 reload policy are :
-
atEnd: tellsWidgetKitto request a new timeline only after the date of the last entry has passed -
after(date: Date): tellsWidgetKitto request a new timeline only after a specified date -
never: tellsWidgetKitto never request a new timeline, the app will let WidgetKit know when a new timeline is available
Some additional information, WidgetKit can use URLSession to kick off a task and use batch requests as well background session, however, be careful with how much network request is needed. Besides that widget relevance is particularly useful when the user has multiple widgets into a smart stack: the stack will be sorted based on each TimelineEntryRelevance, duration, and more. Ready for the starter project, stay tuned !!