Wrapper Pattern Swift in 5 minutes
Understanding type of wrapper pattern in Swift
Have you ever heard about the problem that you need to separate two modules working independently without knowing each other implementation, but requires to be able to communicate easily by only sending necessary data? Most of the advanced use cases will face this real-world use case and we require a more advanced design pattern to be able to solve this pattern to give more scalability to the project. There is a general concept about “Wrapping” an object through an intermediary class that can adapt to each other. A lot of structural design pattern that handles this problem. There are five most common design patterns that able to solve this problem, state as below:
-
Proxy could be used when you want to lazy-instantiate an object or hide the fact that you’re calling a remote service or control access to the object
-
Decorator is also called “Smart Proxy.” This is used when you want to add functionality to an object, but not by extending that object’s type. This allows you to do so at runtime
-
Adapter is used when you have an abstract interface, and you want to map that interface to another object which has a similar functional role, but a different interface
-
Bridge is very similar to Adapter, but we call it Bridge when you define both the abstract interface and the underlying implementation. I.e. you’re not adapting to some legacy or third-party code, you’re the designer of all the code but you need to be able to swap out different implementations.
-
Facade is a higher-level (read: simpler) interface to a subsystem of one or more classes. Suppose you have a complex concept that requires multiple objects to represent. Making changes to that set of objects is confusing because you don’t always know which object has the method you need to call. That’s the time to write a Facade that provides high-level methods for all the complex operations you can do to the collection of objects
We can either choose one of the above general pattern to solve our case, and all of them basically is a wrapper pattern, however depending on the use case, this time I will cover about Adapter pattern (which widely used by many developers) to solve compatibility to communicate with 2 or more services on a different layer.
REAL-WORLD USE CASE
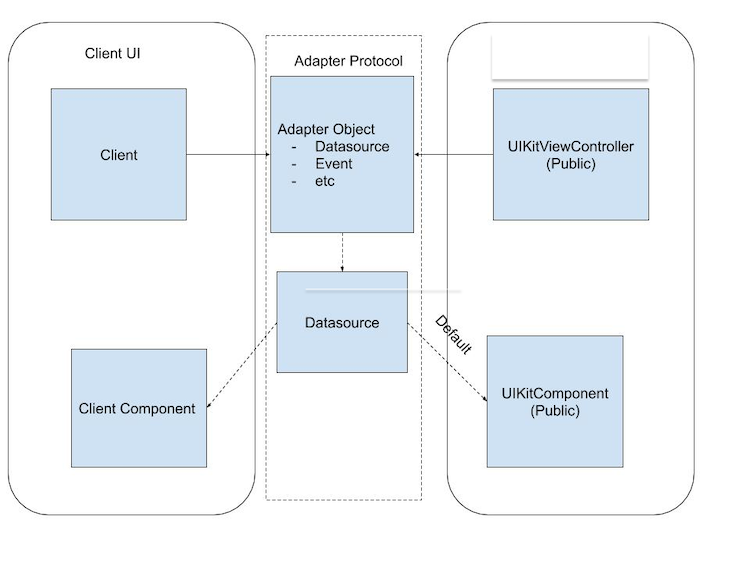
Once upon a time, I have a requirement to satisfy our client by making a framework to hide our internal solution toward our Messaging service through a beautiful interface, therefore I created an UIKit SDK. Next, they would like to integrate our UIKit, however not every of our functionality, some of them, which is we called as a component, would like to reuse it and can comply with their own UI and data source without interfering our business logic. So how do we need to solve this case? We will create a solution that we can provide them a way that they can integrate their own data sources of both UI and model with our framework as well hid the complexity behind. In this article, I would like to limit it only to our messaging list UI. See the below picture to help you understand more of the solution with the adapter.
CODE
Okay, let start to code. First, let limit what are the things that the client is able to inject and communicate to us. We want to limit them only able to set the number of messages, the UI configuration settings such as background color and text color of the list, and the row cell UI for each message in the list.
 1import Foundation
 2import UIKit
 3
 4// 1.
 5public struct MessageUIConfig {
 6   let backgroundColor: UIColor
 7   let textColor: UIColor
 8}
 9// 2.
10public struct MessageModel {
11   let id: String
12   let text: String
13}
14// 3.
15public protocol MessageCellable where Self: UITableViewCell {
16   var cellReuseIdentifier: String { get }
17   var nib: UINib { get }
18}
19// 4.
20public protocol MessageDatasource {
21   func numberOfMessages() -> Int
22   func messagesForIndex(_ index: Int) -> MessageModel
23}
24// 5.
25public protocol MessageAdapterDelegate {
26   func messageDidClick(_ cell: UITableViewCell, message: MessageModel)
27   func messageWillDisplay(_ cell: UITableViewCell, message: MessageModel)
28}
29// 6.
30public class MessageAdapter {
31   weak var delegate: MessageAdapterDelegate?
32   private(set) var config: MessageUIConfig!
33   private(set) var datasource: MessageDatasource!
34   init(config: MessageUIConfig, datasource: MessageDatasource) {
35    self.config = config
36    self.datasource = datasource
37  }
38}-
MessageUIConfig : This struct represents the configuration of the UI that will be used in the view of our SDK framework
-
MessageModel : This one is a model of the message that the client needs to inject
-
MessageCellable : This protocol represents custom cell if the client wants to use their own UITableViewCell and their own cell identifier. The protocol that wants to conform this one need to be an UITableViewCell and has an UINib from their bundle so our SDK can recognize
-
MessageDatasource : The datasource needed for our SDK which is the number of messages loaded as well finding the message for the specific index in the table view
-
MessageAdapterDelegate : Pretty clear this delegate for sending back out the action from our side to the client
-
MessageAdapter : The main actor, which is the wrapper class for communication from client to us, providing the necessary configuration such as UI and datasource
TIPS : You can also opt-out the UITableViewCell, instead ask client about what kind of UIView they want to inject and we can add it as subview of our own tableviewcell of the message.
NOTE : I put public access specifier because I intend to make this as a public framework so client need to be able access it.
Once it is done, then we can go to write our implementation for exposing data to the client. Open your ViewController then look at the code below :
 1public class ViewController: UIViewController, UITableViewDataSource, UITableViewDelegate {
 2
 3    // If nil then we assume that we use predefined cell type
 4    var cell: MessageCellable?
 5
 6    // NOTE: You should connect to IBOutlet, this just an example for the sake of the article
 7    var tableView: UITableView!
 8
 9    // 1.
10    var adapter: MessageAdapter!
11    override func viewDidLoad() {
12       super.viewDidLoad()
13       // 2.
14       tableView.register(cell?.nib, forCellReuseIdentifier: cell?.cellReuseIdentifier ?? "")
15       tableView.delegate = self
16       tableView.dataSource = self
17       // 3.
18       tableView.backgroundColor = adapter.config.backgroundColor
19    }
20
21    func tableView(_ tableView: UITableView, numberOfRowsInSection section: Int) -> Int {
22      // 4.
23      return adapter.datasource.numberOfMessages()
24    }
25
26    func tableView(_ tableView: UITableView, cellForRowAt indexPath: IndexPath) -> UITableViewCell {
27       return tableView.dequeueReusableCell(withIdentifier: cell?.cellReuseIdentifier ?? "", for: indexPath)
28    }
29
30    func tableView(_ tableView: UITableView, didSelectRowAt indexPath: IndexPath) {
31       let cell = tableView.cellForRow(at: indexPath)
32       // 5.
33       let messageModel = adapter.datasource.messagesForIndex(indexPath.item)
34       adapter.delegate?.messageDidClick(cell!, message: messageModel)
35    }
36
37    func tableView(_ tableView: UITableView, willDisplay cell: UITableViewCell, forRowAt indexPath: IndexPath) {
38       // 6.
39       let messageModel = adapter.datasource.messagesForIndex(indexPath.item)
40       adapter.delegate?.messageWillDisplay(cell, message: messageModel)
41    }
42}-
Reference the adapter into client side. When client wants to reuse the stuff from us, they need to inject the adapter here either through constructor or property injection or method injection
-
Register the custom cell from the client, right now let assume if it exists then we can register it like this base on the protocol we define for them. Later on, we can optimize it by having a default cell view for the message list, if the client decides to not use our built-in cell
-
Example of usage of custom UI configuration from the adapter. We can optimize by having a default value
-
Number of datasource here which is the message is coming from the client datasource
-
Pretty clear this one example we send back the signal to the client regarding the action from us
-
Example of sending back the message model per index from the rendered list in our table view
TIPS : You can always optimize the optional one with the default value.
Now let see how it works from the client POV. As a client what we need to do is create our MessageModel (In case we don’t want to reuse our SDK logic) as well the Adapter and inject it when we want to instantiate and push the VC from our UIKit.
 1import CustomUIKit // Name this base on your own framework
 2// 1. Make the adapter, message model, and so on. Assuming you already have your own class that conform to MessageDatasource and has MessageModel inside, so that should be fine
 3
 4let config = MessageUIConfig(backgroundColor: .red, textColor: .blue)
 5let datasource = OwnMessageDatasource() // Must conform to MessageDatasource
 6let adapter = MessageAdapter(config: config, datasource: datasource)
 7
 8// 2. Call the SDK VC, inject the adapter and push it to current nav controller
 9let vc = ViewController.makeInstance(adapter: customAdapter)
10// vc.adapter = adapter
11navigationController?.pushViewController(vc, animated: true)-
Create your own adapter and inject the custom config and datasource
-
Call the UIKit SDK public ViewController and call the static function of makeInstance that inject the adapter and return the ViewController. Another approach is putting property injection like the code below. All depend on your own approach to tackle client issues
Viola! Done. Assuming you already set up all necessarily required protocol and inject it correctly then you will be fine. You can also optimize and customize the class from your own side before deploying it to the client. I would suggest to always limit what the client can customize, without also making them do the hard work.